

It’s worth noting that moving across from UA to GA4 does not mean that all of your current UA data is also transferred across. This is because GA4 is organised in an altogether different fashion, and carrying data across is simply not possible. Setting up Google Analytics 4 is essentially creating a new GA4 property and coupling it with your current UA property. This means that, when UA ceases to function, the new GA4 property is already up and running. Therefore, to ensure no data is lost during the transition, you should get GA4 set up before Universal Analytics’ ceases to function.
We understand that shifting from one platform to another is always daunting. However, if there’s one thing that we can assure you of, migrating from UA to GA4 couldn’t be simpler – introducing the GA4 SetUp Assistant Wizard!
By using the GA4 Setup Assistant Wizard, the migration process is made a great deal easier.
To get started, log into your current Google Analytics account and click on ‘Admin’. Select the desired account (the one in which you want to create a GA4 property) and click ‘GA4 Setup Assistant’. In the new window, underneath ‘I want to create a new Google Analytics 4 property’, press ‘Get Started’.
And that’s essentially it. You’ll see that only the property name, URL, time zone and currency settings have copied over from your existing Universal Analytics property.
Connecting GA4 to Search Console
Your analytics hub wouldn’t be complete without connecting to Google Search Console (GSC). Connecting to GSC gives you the opportunity to prospect this data in your Google Analytics 4 reports, and GSC also gives you a view of your website’s performance and SEO rankings.
In order to link a GA4 property to Google Search Console, you must be the verified site owner of the GSC property and hold ‘Editor’ permissions for the GA4 property.
Start by signing into your GA4 account and then click on ‘Admin’. In the property column, underneath ‘Property Links’, click onto ‘Search Console Links’ and press ‘Link’ in the top right hand corner. A sliding window will appear, titled ‘Create a link with Search Console’, revealing the final few steps. In this window, you can choose the Google Search Property that you want to create a link for by clicking ‘Choose Accounts’.
Once you’ve selected the desired property and clicked ‘Confirm’, you’ll be asked to select a web stream. Finally, review your steps and click ‘Submit’.
How to set up GA4 in GTM
Setting up Google Analytics 4 in Google Tag Manager is fairly straightforward. There are two types of tags in GA4: GA4 Configuration and GA4 Event. All you need to do is set up these two tags in GTM.
The GA4 Configuration Tag (gtag.js) is the main tracking code required on your site. In order to collect Google Analytics 4 data, you need to fire the Configuration tag on every page on which data is to be collected, and it should fire as soon as possible, before any other Google Analytics 4 event tags are fired.
Here’s how to set this up:
In the desired account for Google Tag Manager, firstly select ‘Add a new tag’ and then ‘Tag Configuration’ and you’ll be presented with the many tag types available. Next you’ll want to select ‘Google Analytics: GA4 Configuration’. Here you’ll be prompted to enter your ‘G’ ID (your measurement ID).
The GA4 Event Tag is required to set up custom event tracking in GA4, in addition to GA4’s already built-in event tags.
Here’s how to set this up:
As above, after selecting ‘Tag Configuration’ click on ‘Google Analytics: GA4 Event’. Then select the Configuration tag you created earlier and specify the name of the event for the Event Name. Click ‘Triggering’ and select the appropriate events that would cause the tag to fire, then finally save this and press ‘Submit’.
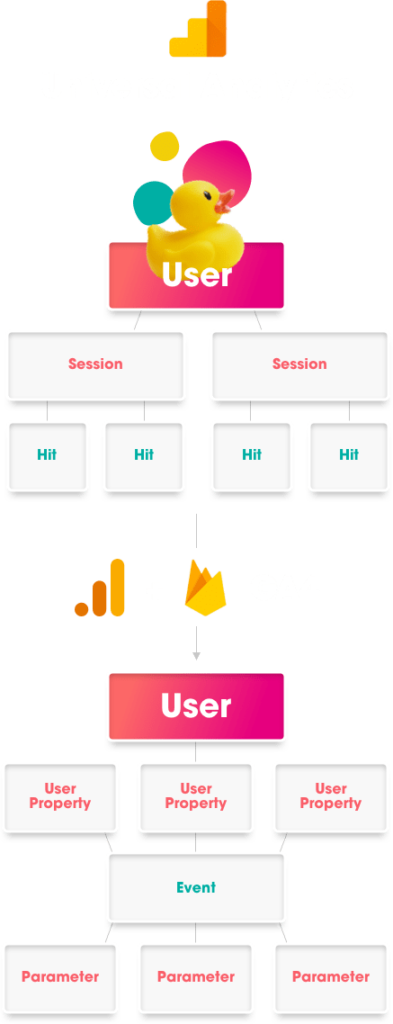
How to create custom events in GA4
Since Google Analytics 4 measures ‘hits’ like transactions, page views and sessions as ‘events’ now, knowing how to create an event in GA4 is paramount to effectively using GA4.
If the type of event you wish to create is not already mentioned in Google’s list of automatically tracked or recommended events, then you’ll want to create a custom event.
You can use Google Tag Manager to create an event, or set this up within GA4. To create an event in GA4, follow the steps outlined below.
Head over to ‘All Events’ > Click on ‘Create Event’ > In the new window click ‘Create’
Here, you can give your Event a name and add your Parameter by selecting one from the drop down list under “Matching Conditions”. Next, you will need to select your operator and input your value. This value should be the last word in the destination URL. Once this is complete, you can click ‘Create’, and you should be able to view your event under ‘Custom Events’.
How to create contact form events for GA4
Creating a contact form event in GA4 is straightforward. To begin, imitate the steps above to create an event and then look for ‘Conversions’ under the ‘Events’ menu. Click on this and select ‘New Conversion Event’. The name you want to enter should be the same as the name of the event you previously created and selected. Finally, click ‘Save’.
How to create Views and Filters in GA4
You may be surprised to learn that ‘Views’ no longer exist on the new GA4 platform. The purpose of creating a ‘View’ in Universal Analytics was to customise and analyse your data through the use of filters. However, since this feature has been discontinued for Google Analytics 4, it asks the question “what does GA4 use instead of views?”
In Google Analytics 4, you are presented with a single reporting view that collects data from your data sources. To customise your view, you use data filters, instead of view filters like in Universal Analytics. Through the use of data filters, you can choose to include or exclude certain event data from your reports. When creating an include filter, only data that matches that filter is processed. And when creating an exclude filter, data that matches that filter is not processed. Applying a data filter makes the change permanent, as Google says, “Once you apply a filter, the effect on the data is permanent; for example, if you apply an exclude filter, that data is never processed and will never be available in Analytics.”
Luckily each filter has 3 different modes: Testing, Active and Inactive. Therefore, you can test out a filter without applying any permanent changes.
Currently, there are two types of data filters you can use: Developer traffic and Internal traffic.
To create a filter, follow these steps:
- Sign into your Google analytics account and head to the relevant property.
- Click ‘Admin’ > Data Settings > Data Filters > Click ‘Create Filter’.
- You’ll then need to enter a name for the filter that begins with a unicode letter and only contains unicode letters, spaces, underscores and numbers.
- Then select your filter type – usually Developer traffic or Internal traffic – and your filter operation (Include or Exclude).
- Finally, choose the mode of your filter – usually Testing, Active or Inactive – and click ‘Save Filter’.
Once you have created your filters, you can always return to them to edit, activate, deactivate or delete.